- Basics
-
Monitors and Windows

- Camera-Configuration at

Back to TV-Guider Homepage
The TV-Guiding-System at each telescope consists in principal of two components:
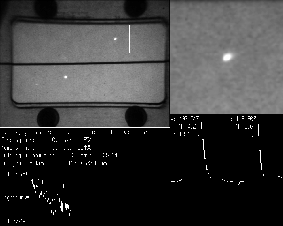
The TV-Guider-System uses two monitors:


One of the following 5 configurations has to be selected at startup of the TV-Guider program:
At the 2.2 one of three configurations has to be chosen at start of the program:
In configuration Imaging you can use the TV-Guider for Acquisition
(On-axis camera) and for Guiding (Off-axis camera). To enhance the accessible
field for finding a guide star the Off-axis camera can be moved in one direction
(slider Guide field). If you are working with the Cassegrain spectrograph
(Configuration Spectroscopy) the On-axis camera serves for Slit-view,
too. The Slit-view mode can be used both for Acquisition and Guiding. At
the Coude focus only one camera is installed, looking on the slit.
Camera-Options
- Cas On-axis Camera: 3 filter, aperture and focus
- Cas Off-axis Camera: focus and transversal movement (slider Guide
field)
- Coude Camera: 3 filter and aperture.
The TV-Guider of the 1.23m telescope (Cassegrain focus) is part of the
Instrumentenansatz, which normally is used for CCD direct imaging.
Thus the TV-Guider can only be used if that Instrumentenansatz is
installed at the telescope. The TV-Guider has only one configuration: it
uses a single movable camera for both On-axis (acquisition) and off-axis
(guiding) operations, --- thus the camera position (slider Position)
has to be set accordingly. The borders of the guiding regions left and right
of the on-axis beam depend on the size of the used CCD-detector and will
be given to you by the Calar Alto staff. Clicking on
TV-Mode/Acquisition or TV-Mode/Guiding will move the camera to
the on-axis position (0) or into the beginning of the right guiding region,
respectively.
Camera-Options: 3 filter, aperture, and focus.
Note: The camera-focus is automatically adjusted for the difference
between on-axis and off-axis positions if you once pressed the button Focus
ok!. Yet be sure that you focussed the TV-Camera properly at the present
position before initialization of the focus adjustment. Any movement of the
focus slider (or entering set -f in the Command shell) stops the
automatic adjustment of the focus difference!
You switch between the different camera-modes of each configuration by a mouse-click on the equivalent command in the menue TV-Mode of the TV-Guider Control Panel. Changing mode/camera needs some activities, so you have to wait for completion of that action. The "Busy"-state is symbolized by a change of the Cursor shape: when "busy", the Cursor looks like a small watch.
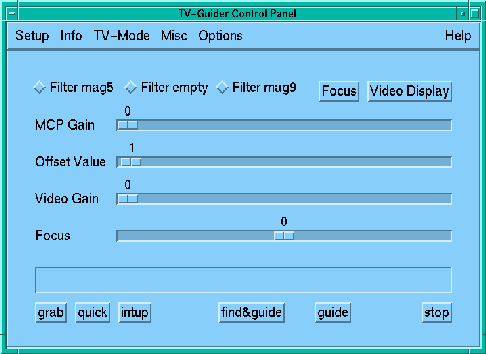
All tasks related to selecting or adjusting a camera are performed within
the TV-Guider Control Panel. Up to four sliders help you to adjust the parameters
of the active camera, i.e. gains (MCP-Gain, Video-Gain, Offset)
and, - besides Coude, also focus. If filters are supported, the diamond buttons
allow you to select one of the available filters. Clicking with the mouse
on menue Info/Filterlist will show you more informations about the
filters installed. The iris-diaphragm is closed, opened or stopped by clicking
on the equivalent commands in the window that is opened by menue
Misc/Aperture
The sliders generally are scaled to 100. Moving the slider is done by mouse,
i.e. by dragging it to the goal position or by clicking with the left
mouse button, which causes a stepwise moving of the slider. For indication
of Busy-state the Cursor shape changes to a small clock. The momentarily
disabled functions always are shown slightly shadowed.
The shutters of the cameras normally open and close automatically when using
the image acquisition commands grab, quick and
intup. If too much light is seen by the camera, it will go in
Overload on followed by a beep and a warning message on the control
monitor. The shutter is closed automatically and the Overload status is reset
when clicking on Dismiss in the warning window.
Before starting a new image acquisition you first have to prepare for conditions
to prevent the camera from going in overload again, e.g. by using a density
filter or the iris-diaphragm, or by moving the camera or the telescope,
respectively.
Attention: Too much light can cause damage to the camera.
So, be careful where the active camera looks at when you open the
shutter by one of the image acquisition commands. The input plane of the
camera, which is the input cathode of the intensifier, is the critical element
that can be damaged. A very low MCP- and Video-Gain will pretend a sufficient
low signal, although the incoming light itself may be already too bright
for the cathode. Thus a medium or high MCP- and Video Gain (> 50%) makes
sure that the overload mechanism functions properly. When the camera does
not go in overload with these gain values there is no problem to reduce the
gains further. So, as a good precaution, use grab or
intup and start with a high MCP- and Video-Gain (e.g. 70)!
Use intup or grab for an overview.
Use grab or quick when telescope movement has to be
watched.
Video Display-Cursor:
Via the button Video Display in the TV-Guider-Control Panel you have
access to the Video Display Cursor on the Video-Monitor. Then a cursor appears
on the Video-Screen thus symbolizing that you are now in Video Display CURSOR
MODE. Look at the Video-Screen and move the mouse which controls now the
Cursor on the Video-Screen. Click the right mouse button to return to the
Control Monitor. If there are problems to leave the Video-Display see
Troubleshooting .
Note: CURSOR MODE on the Video-Screen partly is available with active grab. It is not available during active quick or intup image acquisition.
In CURSOR MODE the following commands are supported:
Note: At the 1.23m telescope you still have to focus manually. Yet the camera-focus is automatically adjusted for the difference between on-axis and off-axis positions if you once pressed the button Focus ok!. Yet be sure that you focussed the TV-Camera properly at the present position before initialization of the off-axis focus adjustment. Any movement of the focus slider (or entering set -f in the Command shell) stops the automatic adjustment of the focus difference!
users/tvg/observerx, where x stands for 1,2,3.
gtar cf server:/dev/rstX *.fits
(server = CA2, and rstX = rst4, e.g.)
The following prompts for username and password must be answered (e.g. observer3
and the password for observer3 at CA2).
tvg.overlay
in the directory /users/tvg/observerX/ (X=1/2/3, respectivly).
The command load_ov file loads the file and ov
causes the program to draw the desired features. Don't forget to disable
the function Autoclear overlay in menue Options/General
!
The Cameras have 764 x 574 Pixel and their scales at the different telescope
foci are as following:
| Telescope focus | Pixel per arcsec | Field [arcmin x arcmin] | Limit [mag] |
|---|---|---|---|
| 1.23m Cas | 2.5 | 5 x 3.8 | 18.5 |
| 2.2m Cas On-axis and Off-axis | 4.5 | 2.8 x 2.1 | 18.5 |
| 2.2m Cas Slit-view, Optic I | 2.7 | 4.5 x 3.4 | 19.5 |
| 2.2m Cas Slit-view, Optic II | 12.2 | 1.0 x 0.8 | |
| 2.2m Coude | |||
| 3.5m Prime K2 | 2.8 | 4.5 x 3.4 | |
| 3.5m Prime K3 | 3.5 | 3.6 x 2.7 | |
| 3.5m Cas On-axis and Off-axis, f:10 | 2.7 | 4.6 x 3.6 | |
| 3.5m Cas On-axis and Off-axis, f:45 | 12.2 | 1.0 x 0.8 | |
| 3.5 Cas Slit-view, Optic I | 2.5 | 5.0 x 3.8 | |
| 3.5 Cas Slit-view, Optic II | 4.3 | 2.9 x 2.2 | |
| 3.5m Cas ALFA | 2.7 | 4.6 x 3.6 |
We apologize for the missing values, the data will be completed as soon as possible.
The meaning of the data are as following:
| First line: | DATE | LID | GWIDTH |
| Logical Camera ID | Width for centroiding aperture | ||
| e.g. | 20-May-1995 | 5 | 55 |
| Second line: | UT | Hour Angle | Sideral Time | Deklination |
| e.g. | 21 17 24 | 22 43 55.7 | 12 59 26.2 | 19 11 30 |
| Third line: | Rectaszensation | Deklination | Cass-Angle |
| e.g. | 14 15 30.5 | 19 11 30 | 359.9 |
| Following lines: | PC-Time | d u | d v | Max Counts | Intensity | fwhm_x | fwhm_y |
| sec after 0.0UT | [0.1"] | [0.1"] | in Guide window | [Counts] | ["] | ["] | |
| e.g. | 76552 | 6 | -10 | 5818 | 102140 | 4.0 | 3.6 |
| Last line: | UT | Hour Angle | Sideral Time | Deklination |
| e.g. | 21 20 10 | 22 46 41.7 | 13 02 12.3 | 19 11 29 |
DATE=20-May-1995, LID=5, GWIDTH=55
TDATA=Q   T 21 17 24 22 43 55.7 12 59 26.2  19 11 30
TDATA_35=Q   W 14 15 30.5  19 11 30  359.9
76552, 6, -10, 5818, 102140, 4.0, 3.6
76563, -3, 0, 5917, 7126, 4.3, 4.0
76572, 1, 3, 5968, 61312, 4.2, 4.3
76581, -9, 0, 5937, 182999, 4.0, 3.3
76590, 17, -6, 5921, 243100, 4.3, 4.1
76599, -11, -4, 5943, 4984, 0.0, 0.6
76608, -6, 8, 5971, 215761, 4.2, 3.6
76620, -1, 2, 5972, 165606, 4.2, 3.8
76628, 11, 0, 5965, 140409, 3.8, 3.8
76638, 0, 0, 5949, 84287, 3.8, 3.8
76644, -3, -1, 5923, 64465, 3.9, 3.7
76654, -12, 0, 5986, 45071, 4.1, 3.4
76663, 7, -6, 5933, 197904, 3.5, 3.4
76672, 4, 8, 5982, 118589, 4.2, 4.2
76683, -5, -2, 5991, 84044, 4.2, 3.3
76692, 0, -4, 5984, 121386, 4.0, 3.1
76706, 12, 2, 6014, 200839, 4.6, 3.4
TDATA_END=Q   T 21 20 10 22 46 41.7 13 02 12.3  19 11 29
| Project: | Uwe Graser | MPIA | graser@mpia-hd.mpg.de |
| Software: | Stefan Hippler | MPIA | hippler@mpia-hd.mpg.de |
| Electronics: | Ralf Klein | MPIA | klein@mpia-hd.mpg.de |
| Maintenance: | Electronic group | Calar Alto | wilhelmi@caha.es |
| Support: | Ulrich Thiele | Calar Alto | thiele'at'caha.es |
Uwe Graser