
Observer's Manual
Version 1.5 - Aug. '98
by P. Bizenberger
with help from
T. Herbst, R. Lenzen, D. Thompson
Table of Contents
Introduction
This manual is currently under construction, and likely
to change frequently. The authors welcome and suggestions for improvement,
additional information which should be included here, and otherwise constructive
criticism.
In this manual, we are assuming that the reader is
already familiar with infrared observing in general, as well as the reduction
of data into a final, usable form. If not, the reader is directed to the
MAGIC
manual, where much of this information can be found. We attempt here
to provide enough information so the user can prepare for and execute a
successful observing program with Omega Cass.
S/N Consideration
In most instances of IR observations, the target object
is fainter than the sky background. For a typical exposure with Omega Cass
using double-correlated sampling (see below), the read noise Nr is approximately
35 electrons, and the dark current is < 0.1 electrons / second. The
photon noise associated with the sky background increases as the square
root of time. Therefore, the signal to noise ratio increases approximately
linearly with time until sufficient background photons have been collected
to dominate the noise sources. This occurs when when the background signal
is more than the square of the read noise, or 1225 electrons. With Omega
Cass, the conversion factor between electrons and Analog to Digital Counts
(ADC - one ADC is the minimum signal unit recorded by the computer) in
the image is 4 electrons / ADC. Therefore, any integration with less than
approximately
300 sky counts is read noise limited , and the signal to noise ratio
increases linearly with time. Longer exposures are background limited,
and the signal to noise ratio increases only as the square root of time.
Integrating for much longer than the time needed
to reach the background limit does not provide any advantage to the observer,
since a series of independent exposures will also increase the S/N ratio
as square root of time. In fact, the variability of the sky level and other
factors make it advantageous to end an exposure when the background limit
is reached. For broad band images with Omega Cass, this usually requires
only a few seconds.
The Array - Readout Techniques
Omega Cass's detector is a Rockwell 1024 x 1024
HAWAII
array. The detector can be read with the following modes.
Single Correlated Read
This is the simplest readout scheme. The pixels are
reset at the beginning of an exposure, and read out once at the end of
the integration. This does not remove the variable pedestal level (kT noise)
and any initial offsets which can vary from pixel to pixel. We do not recommend
using this mode for observation. Its main usefulness is in checking the
signal level for saturation.
Double Correlated Read (Reset Read
Read)
This is the most commonly used mode for general observing.
The array is read immediately after the initial reset and again just before
the final reset at the end of the integration. This eliminates the kTC
noise and other offsets, but increases the read noise by root-2 because
the noise from two readouts goes into a single image.
Minimum integration time is 0.84 seconds but the
total time to get an image is 1.68 seconds because of the two required
reads.
Full MPIA Mode
This mode is implemented now. It is supposed to give
a higher observing efficiency compared to the existing modes. See the following
graph for the calculated efficiency of a stack of 15 images. The
MPIA mode is the common double correlated read mode (Reset Read Read) which
is usually used with Omega Cass. The IRL mode is the double correlated
read mode used with MAGIC and Omega Prime. For short integration times
is the efficiency of the Full MPIA mode significant higher to the other
modes. Since the overhead of one mode is constant for a read out stack,
the ratio of overhead to integration time is the worst for minimum integration
time.
The noise is the same as for the Double Correlated
Read. Minimum integration time is 1.68 seconds.
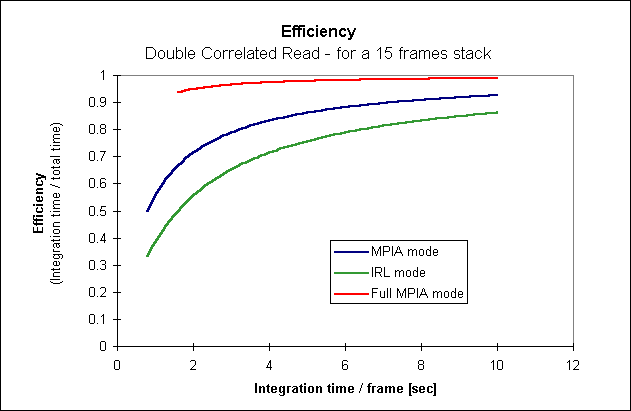
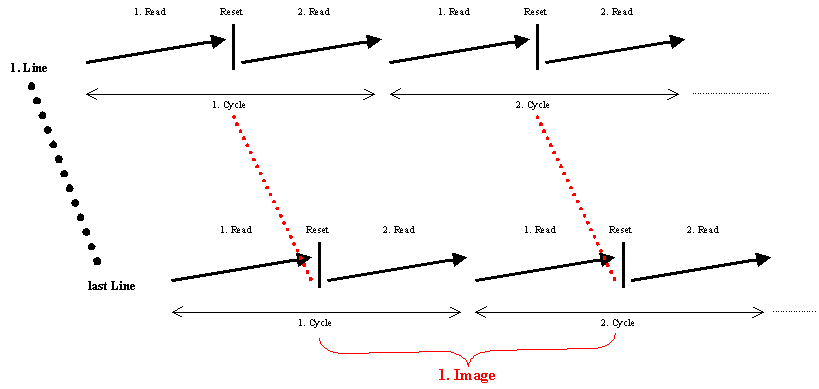
The common double correlated read out modes are 'frame
orientated' i.e. you reset the hole array, read the hole array, read again
the hole array and subtract the two frames. Assuming a very fast reset,
this takes twice the time to read the array, to achieve an image with minimum
integration time. In this case, a single pixel integrates light only as
long as it takes to read the array once. The resulting efficiency is for
minimum integration time 50%, changing to better values for longer integration
times.
The new Full MPIA mode is 'line orientated'. You
read one line, reset the same line and read it again. Do this for the hole
array. Next cycle is the same. You read one line, reset the same line and
read it again. To archive a double correlated image, you subtract the second
read of the first cycle from the first read of the second cycle. Repeat
this for the hole array. The efficiency is in this case almost 100%, it
is not exact 100% since the reset is not infinite short and the first read
of the first cycle (as well as the second read of the last cycle) is lost
and counts as an overhead. This overhead becomes negligible when taking
many frames in a row. The graph is for a stack of 15 images (Repeat 15).
For a single image, this mode shows no advantage to the MPIA mode, it rather
has the disadvantage of the longer minimum itegration time.
The minimum integration time
increases from 0.84 to 1.68 seconds because still two reads are necessary
for a double correlated read. But the integration of photons is done during
the hole read process.
Subarrays
This readout scheme reads a square box of variable size.
This mode is well-suited to occultations. The actual readout technique
is Reset Read Read. The size of the subframe must be an even number. In
addition the subarray has to be located entirely in one quadrant of the
detector.
The readout speed depends on the size of the subframe
(see table below).
size of subarray
/ pixel
|
# of frames
|
total time
for all frames
/ sec
|
min. integration time
per frame
/ msec
|
|
16 x 16
|
1000
|
2.2
|
1.0
|
|
"
|
10000
|
21.2
|
1.0
|
|
32 x 32
|
1000
|
7.3
|
4.0
|
|
"
|
3000
|
21.3
|
4.0
|
|
64 x 64
|
1000
|
27.4
|
14.0
|
data for the position described in the following
The minimum integration time for a subarray depends
of the location on the array. The pixels of a quadrant are clocked line
by line. To read a subarray, all previous lines to the subarray must be
clocked as well as all previous pixel in a line where the subarray is located.
To avoid an overhead by clocking unused lines and pixels, the best location
for a subarry is in the corner of an quadrant where the clocking of a quadrant
starts. In the following image, the quadrants are labeled #1 to #4 and
the direction of clocking is indicated. Taking in account that the optics
have less aberrations in the center region, it is best to locate the subarray
in the lower left corner of quadrant #4. At this position, the best performance
for subarrays is archived. See the square, orange box.
The best position for subarrays using ALFA is the
lower right corner of quadrant #1. This is due to an additional mirror
of the image by the ALFA optics.
The Camera
Optical Set-up
Omega Cass is a re-imaging camera with three different
image scales accepting input beams up to f/8 . The scales get changed by
changing the cameras of the optic which are mounted on a wheel remotely
controlled by software. The total length of the optical path is constant
for all three scales.
All filters, grisms and polarisiers are close to
the pupil position in the parallel beam. The optics are designed for the
whole spectral range from 1.0 to 2.5 µm. There is no refocusing necessary
due to a filter change or optic change.
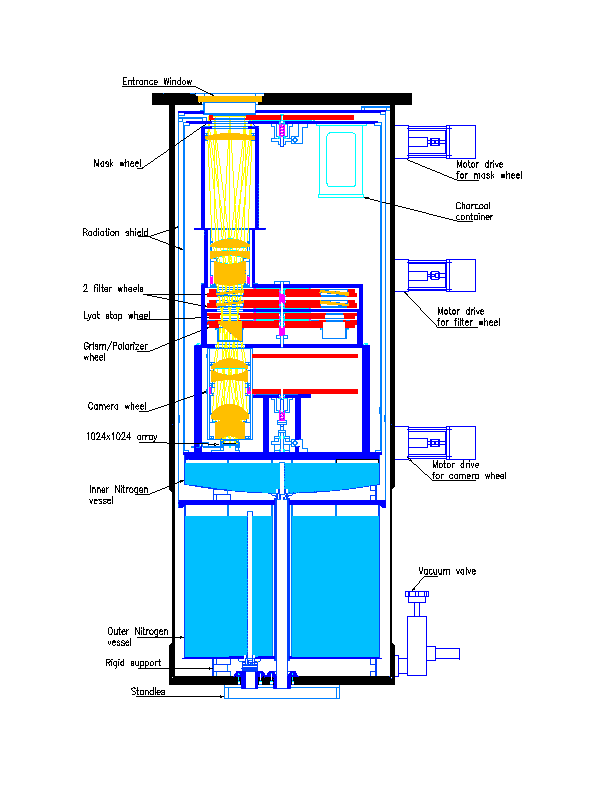
Mechanical Set-up
The Omega Cass dewar is equipped with two tanks for
liquid nitrogen. The outer tank and the connected outer baffle operates
as a radiation shield. The inner tank and inner baffle preserves an area
stabilized at 77 Kelvin. Here, all the optics, filters and masks are mounted.
The detector is direct mounted to the cold plate of the inner tank. There
are four temperature sensors mounted in the dewar. The temperature should
be:
|
name of sensor
|
nominal temperature
|
location
|
|
outer
|
~ 90 K
|
mounted on top of the outer shield
|
|
inner
|
<80K
|
mounted on top of the inner shield
|
|
filter
|
<80 K
|
mounted on the filter box
|
|
array
|
<80 K
|
mounted next to the detector
|
For all temperature sensors is only one monitor available, to
display all sensors switching cables is necessary.
Data Handling
It takes a considerable amount of time to transfer
the data from the camera and save it to the hard-drive on the workstation.
To reclaim some of this otherwise lost time, the software has been configured
with two image buffers. Thus, a new image can be read out while the previous
image is being saved. (See also the Software manual, section 11 Macro Format)
Mounting and Aligning
The camera must be aligned with the telescope before
each observing run!
Usually, the camera will be mounted and aligned by
the Calar Alto staff but the observer must double check to guarantee a
perfect set-up. Aligning will take place in the beginning of the first
night of observing since you need a star to do this. To align the camera
with the telescope optical axis is important in terms of background reduction.
The entrance pupil of the telescope must be aligned with the Lyot stop
of the camera. If you are not familiar with this procedure please see the
MAGIC manual for basic instructions.
To align the entrance pupil of the telescope with
the Lyot stop of Omega Cass, you have to apply two different methods for
the two directions (north-south and east-west). The mounting flange can
be tilted in one direction which allows the alignment in the east-west
direction. The north-south direction can only be aligned by rotation of
the Lyot stop wheel.
Aligning a single wheel can be done with the following
command wheel # rel xxxx in
the interpreter window of the software.
Where # is the number of the wheel (0 = optic wheel, 1 = grism wheel,
2 = lyot wheel, 3 = filter2 wheel, 4 = filter1 wheel, 5 = mask wheel) and
xxxx is the number of steps. All wheels have a different gear ratio i.e.
a given number of steps moves the wheels a different amount.
If you have aligned a wheel, you must edit the corresponding
info file with the new position. Otherwise the software will remember the
initial position and will use it again for further movements. After updating
the info file, you also must tell the software that the info files have
changed. Apply the command wheel rdb and this will update the software
automatically.
Note! The info files are located in a privileged area. A password
is required to allow access, ask the night assistant for help.
Observing with Omega Cass
Startup Procedure
The first day of your observing run you will get an
introduction to the telescope, camera and software from the Calar Alto
staff. To start up the software see the Software
Manual.
Direct Imaging
The optical design of Omega Cass offers three different
image scales by exchanging individual cameras while the collimator is the
same for all systems.
Omega Cass offers you the following pixelscales for
the following telescope configurations:
| 3.5 m - f/10 |
~ 0.3 "/pixel |
| ~ 0.2 "/pixel |
| ~ 0.1 "/pixel |
3.5 m - with ALFA
f/25 |
~ 0.12 "/pixel |
| ~ 0.08 "/pixel |
| ~ 0.04 "/pixel |
| 3.5 m - f/45 |
~ 0.067 "/pixel |
| ~ 0.044 "/pixel |
| ~ 0.022 "/pixel |
| 2.2 m - f/8 |
~ 0.6 "/pixel |
| ~ 0.4 "/pixel |
| ~ 0.2 "/pixel |
Omega Cass offers a set of broad band and narrow
band filters for direct imaging. See the Technical
Characteristics for a full list of filters.
Spectroscopy
NIR-spectroscopy can be done using Omega Cass in long-slit
or slitless mode:
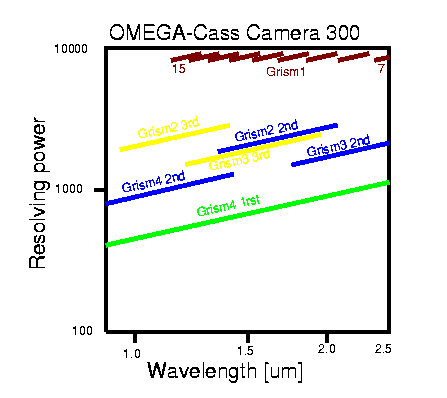
At present, two grisms are available for Omega Cass:
-
Grism3 is used in second order for the K band (1.75-2.5 µm, spectral
resolution 1.1 nm/pixel) and in third order for the H and parts of the
J band (1.18 - 1.9 µm, spectral resolution 0.75 nm/pixel).
-
Grism4 is used in first order for all NIR bands between 0.9 µm to
2.5 µm providing a spectral resolution of 2.1 nm/pixel.
The calibration curves for grism3
and grism4 are available.
Two additional grisms are in preparation:
-
Grism1 will offer the highest available resolution of about 0.25 nm/pixel
for higher diffraction orders distributed over the K-band.
-
Grism2 is optimized to provide medium resolution of about 0.8 nm/pixel
for the short band region between 0.9 µm and 1.9 µm
Long slits of 24 mm length are offered, corresponding
to 2.36 arcmin (f/10) or 0.95 arcmin (f/25) with different slit widths.
See the Technical Characteristics
for the current set-up of the mask wheel.
Objects can be centered into the slit by first taking
a direct image for the selected wavelength band. The image of the object
can now be moved to the required position on the detector. Now the slit
is switched in, a direct image
is taken through the slit. Recentering is provided if necessary. For
a last step, the required grism is positioned.
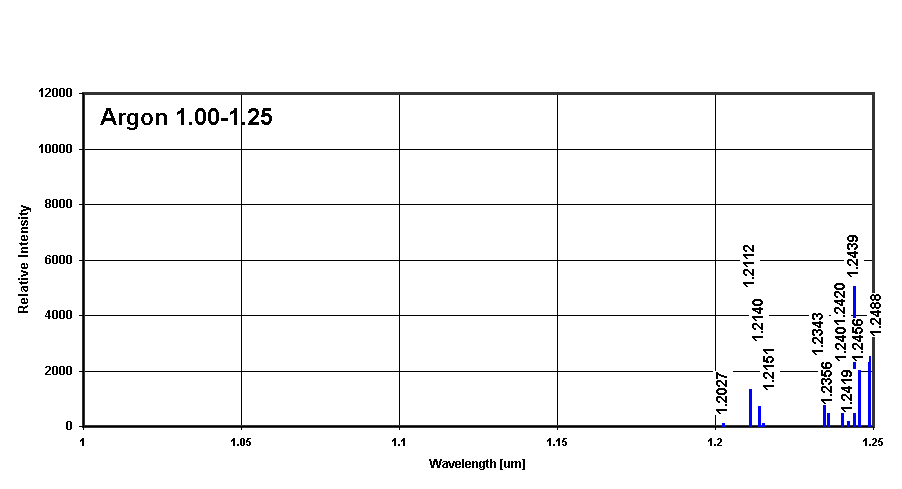
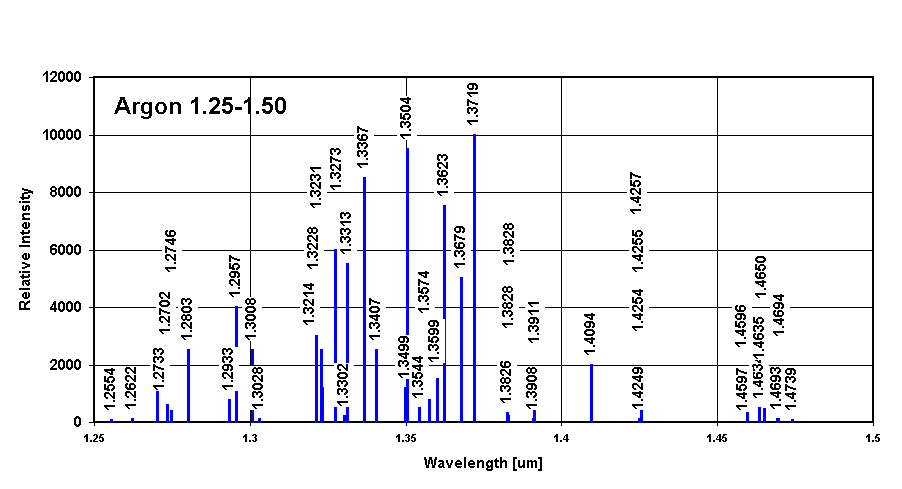
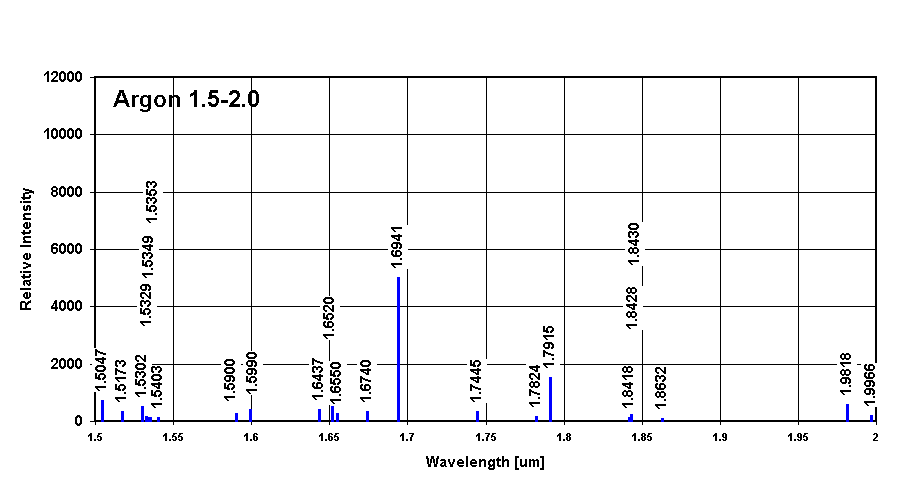
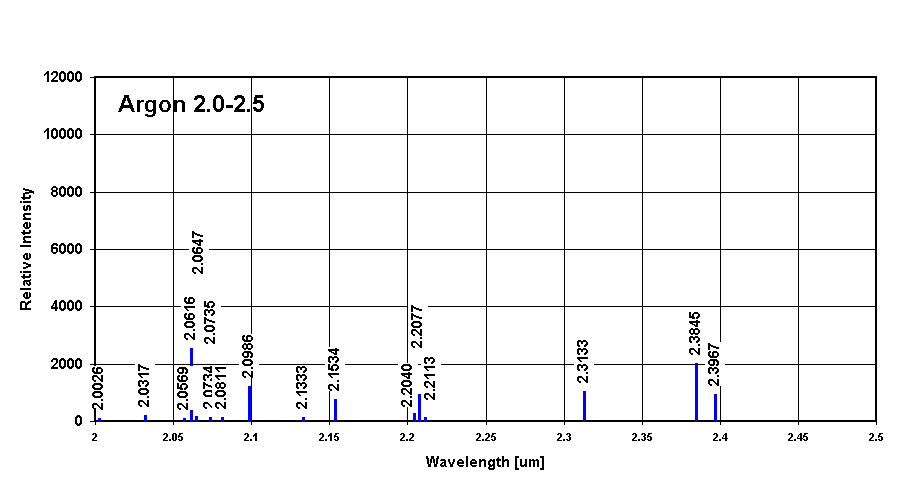
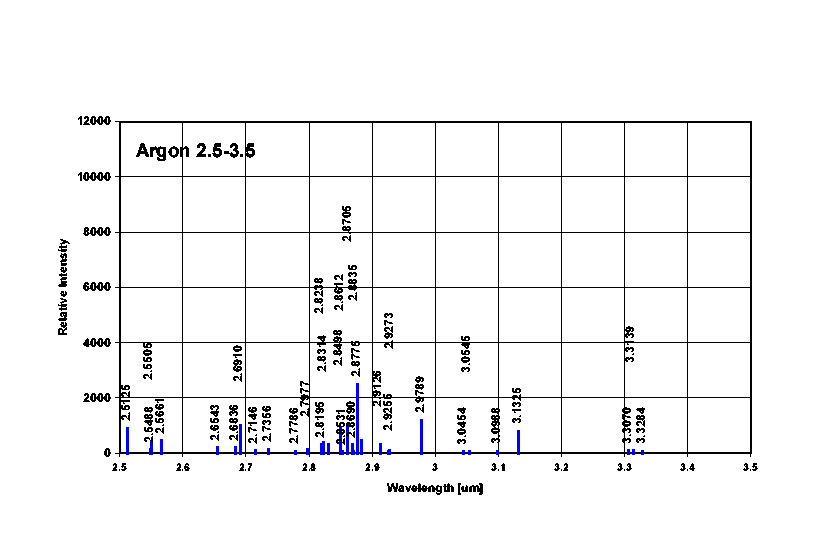
Wavelength calibration can be done by using sky spectrum
or by switching in a calibration lamp (Argon). The argon spectrum is given
in the following wavelength ranges: 1.0
- 1.25 µm, 1.25 - 1.50 µm,
1.50
- 2.0 µm, 2.0 - 2.5
µm and 2.5 - 3.5 µm. The
last range is not used for Omega Cass of course but it is for completeness.
In principle, the spectroscopic mode of Omega-Cass
can be combined with the adaptive optics system ALFA, however, using this
combination no slit rotation at the sky will be possible, the fixed position
angle is -14 deg. A rotator, that will provide slit rotation even in combination
with ALFA is in preparation.
Polarimetry
There are two polarimetric modes for Omega-Cass: For
very compact or point like objects the double-imaging or Wollaston-mode
is used: Two Wollaston prisms are providing double images of about 17 arcsec
beam separation (f/10), one in North-South direction, a second one for
a position angle of 45 deg. Wollaston prisms are perfect polarizers in
the 1-2.5 µm region. The beam separation depends of the wavelength.
A calibration curve is available
The second mode uses wire-grid polarizers which provide
single linear polarized images. Four single images have to be taken through
the four offered analyzers which are mounted at position angles of 0, 45,
90 and 135 deg.
Calibration
Sky Subtraction
Point Sources-Moving Sky
When the observing targets are pointlike or small, most of the array is,
in fact, measuring the sky background level. Offsetting the telescope between
exposures produces a sequence in which a subsection of the array contains
the target object in one exposure and sky measurements in all the others.
A median average of these sky frames will eliminate the pointlike sources
(i.e. an image in which each pixel is replaced by the median of values
at that location in all the sky frames) . Taking the median of, say, four
neighbouring frames will give a sky level that is well-correlated temporally
and spatially with that in the target exposure. This so-called "moving
sky" frame works extremely well with virtually no penalty in observing
time, since you should already be moving the telescope slightly between
frames to account for bad pixels. You must move the telescope by at
least twice the size of the largest observing target for this technique
to be effective.
Extended Sources
When the observing target is extended over a significant portion of the
detector, the moving median will be contaminated by source flux and will
not reflect the current sky level. In these circumstances, the observer
must
offset the telescope to a relatively source-free area to measure the
sky. A typical sequence may be Object-Sky-Sky-Object-Object-Sky-Sky...
The atmospheric conditions are the major factor in deciding how frequently
to measure the sky level. Note also that most "empty" fields contain numerous
stars, particularly given the large field and high sensitivity of Omega
Cass. You should offset the telescope between sky exposures and form the
median as before to eliminate point sources. The positive aspect of taking
frequent off-source exposures is that it gives you an opportunity to monitor
the atmospheric transparency, seeing, and focus using a star in the sky
field.
Flat Fielding
The flat field image provides a means of removing pixel to pixel gain variations
in the array. There are several different techniques for producing the
flat field, but they all share the goal of exposing the detector to uniform
illumination. The image values in the resulting frame will be proportional
to the pixel gains. Division of the object frames by the flat field will
eliminate these variations.
Linearity
The calibration procedures assume that the voltage on the detector is linearly
proportional to the incident flux.
A plot of the relationship fot the detector in Omega Cass will be placed
here. (soon)
Note that the linearity plot uses the median counts for all pixels.
Some pixels are more nonlinear and others less. Observers who need accurate
photometry will want to correct all their exposures for nonlinearity before
proceeding with the standard data reduction. We recommend using a second
or third order polynomial fit to each detector's response.
A linearization matrix is not yet available.
Flux Zero Points
Calculated Counts for Zero Magintude according to the formula:
CFZM = (source - sky) * 10^ (0.4 mag)
| Telescope and Camera Configuration |
J Filter |
H Filter |
K' Filter |
K Filter |
|
3.5 m f/10 - 0.3 arcsec/pixel
|
|
|
|
|
| 3.5 m f/10 - 0.2 arcsec/pixel |
|
|
|
|
|
3.5 m f/10 - 0.1 arcsec/pixel
|
|
|
|
|
|
3.5 m f/25 - 0.3 arcsec/pixel
|
|
|
|
|
| 3.5 m f/25 - 0.2 arcsec/pixel |
|
|
|
|
|
3.5 m f/25 - 0.1 arcsec/pixel
|
|
|
|
|
!! Waiting for observer's feedback !!
Faint IR Standard Stars
There is a list of UKIRT
faint standard stars from Casali (1992 UKIRT Newsletter, 4, 33) available.
Dave Thompson prepared the corresponding finding charts and also a list
of interpolated K' magnitudes.
Troubleshooting
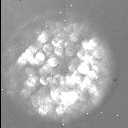 If you get images like this, check the entrance window of the dewar if
water is condensed.
If you get images like this, check the entrance window of the dewar if
water is condensed.
Peter Bizenberger
biz@mpia-hd.mpg.de
Tel. (+49) 6221 528311
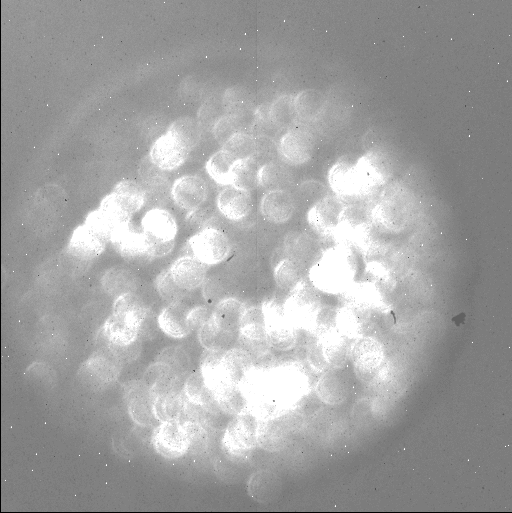 If you get images like this, check the entrance window of the dewar if
water is condensed.
If you get images like this, check the entrance window of the dewar if
water is condensed.